Setting up JanusGraph on AWS using EC2 and DynamoDB
Graph Databases are not yet widely used and it is still not completely straightforward to run one in the cloud. I describe here the different steps I made to install and run the JanusGraph database, using the NoSQL database DynamoDB as a storage backend. The cloud is the one from Amazon (AWS).
Architecture
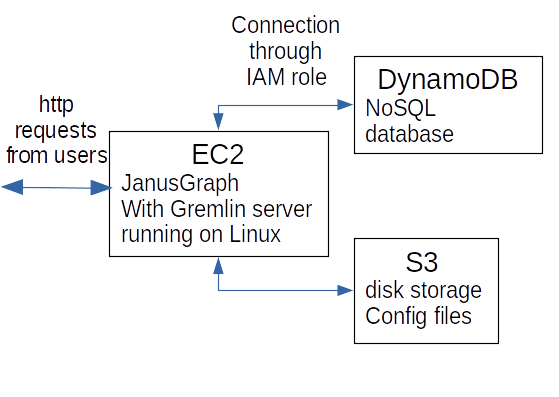
To run the graph database, the idea is use the possibilities offered by a cloud service such as AWS. The JanusGraph is a scalable graph database for which you can choose a backend, in fact a NoSQL database, such as Cassandra, Hbase or BerkeleyDB, for storing the data. The license is Apache 2.0 and the project is owned by the Linux Foundation (It is a fork from the Titan graph database). The repository is here. Although not in the official list, it is also possible to choose Amazon’s DynamoDB. This latter database is the one provided as a service in AWS. You can start it in a few clicks and you are billed on the amount of data it contains. You do not need any computer resources, everything is handled by Amazon.
The idea is to run the JanusGraph on an EC2 machine and make the interface with the DynamoDB for storing the data. Optionally, you may also set up an access to a disk storage (with S3) where you can save the configuration files or any kind of data needed for your app.

In order to help set up the graph database, the AWS team provides some code and directions. All is in there but the guidelines were not exactly leading to what I wanted. I did not want to run the script that launches an EC2 instance fully configured. I wanted to install JanusGraph on my already running EC2 instance and be able to customize it.
The EC2 instance
First, you need an EC2 instance where to install the graph server. Go to the AWS console and launch one (with Linux) if it is not already done. Get your keys (the .pem file) and connect to the instance using ssh. On your machine (Linux or Mac) open a terminal and run
ssh -i path_to_your_pem_file ec2-user@ip_address_of_your_machine
Now you are logged in your EC2 instance, install the pre-requisites by typing in the terminal (first steps in the awslabs’ repo):
curl https://raw.githubusercontent.com/awslabs/dynamodb-janusgraph-storage-backend/master/src/test/resources/install-reqs.sh
The command above prints out a list of instructions which you can inspect and copy+paste the executable shell script to execute to start the pre-requisites.
Then, clone the repository
git clone https://github.com/awslabs/dynamodb-janusgraph-storage-backend.git && cd dynamodb-janusgraph-storage-backend
Inside the cloned repository, the Awslab’s team provide a script for installing JanusGraph. Install the JanusGraph and gremlin server by running, (Check and modify the JanusGraph version to install if needed)
src/test/resources/install-gremlin-server.sh
When this is done, go to the folder where JanusGraph has been installed:
cd server/dynamodb-janusgraph-storage-backend-1.1.1
You need to configure your graph database server.
In the conf folder, you will find the configuration files. You may have to modify the file dynamodb.properties, in particular the line
storage.dynamodb.client.signing-region=us-west-2
Put your region instead. You may do it with the nano editor:
nano conf/dynamodb.properties
Details about the possible configuration choices are given here. If you use single-items you must add
storage.dynamodb.stores.edgestore.data-model=SINGLE
storage.dynamodb.stores.graphindex.data-model=SINGLE
storage.dynamodb.stores.janusgraph_ids.data-model=SINGLE
storage.dynamodb.stores.system_properties.data-model=SINGLE
storage.dynamodb.stores.systemlog.data-model=SINGLE
storage.dynamodb.stores.txlog.data-model=SINGLE
DynamoDB
You need DynamoDB and database tables configured to receive the data from JanusGraph. Go here to check whether you can have access to DynamoDB. To create the table, you need to run the script provided here in CloudFormation. You may access CoudFormation from the AWS console, then create a new stack. Download the script and choose to create the stack from this file.
S3
If you do not have any S3 service running go to the AWS console to start one. You can create a bucket where the configuration file will be stored. With the correct configuration (see next section) you can access the files from the EC2 instance and copy them using the command:
aws s3 cp source_file destination_file
Allow interactions between EC2 and dynamoDB
To allow EC2 to access DynamoDB and S3, create a new IAM role and attach it to the EC2 instance. In this IAM role, choose full access to dynamoDB and read (or full) access to S3.
Running the server
Coming back to the EC2 instance, launch the server (JanusGraph uses the Gremlin server). Go to the correct folder
cd /home/ec2-user/dynamodb-janusgraph-storage-backend/server/dynamodb-janusgraph-storage-backend-1.1.1
Run the server:
bin/gremlin-server.sh conf/gremlin-server/gremlin-server.yaml
Accessing the graph database
In the same directory, you may run the Gremlin console to test and query the database:
bin/gremlin.sh
and inside the console, connect to the server:
:remote connect tinkerpop.server conf/remote.yaml session
:remote console
You should be able to query the graph database. For example, you can load a part of the Marvel database.
Adding Python to the server
Section added on the 19th of September 2017
If you need to query the graph database server using Python, you have to make an additional configuration step for the server ( besides the gremlin python module to include in the Python code).
First note that the following is for JanusGraph version 0.1.1 and Gremlin Server 3.2.3, which is the version available for download at the time of writing. First you must load the Python libraries using:
bin/gremlin-server.sh -i org.apache.tinkerpop gremlin-python 3.2.3
Make sure you are using the correct version of gremlin-python. I made the mistake of installing 3.2.5 instead and it did not work. I found the correct answer here.
Then the gremlin server configuration file must be changed (usually called gremlin-server.yaml). gremlin-python must be added in the scriptEngines section:
scriptEngines: {
  gremlin-groovy: {
    imports: [java.lang.Math],
    staticImports: [java.lang.Math.PI],
    scripts: [scripts/generate-modern.groovy]},
  gremlin-jython: {},
  gremlin-python: {}
}
